
The Lasagne Pot: A Springtime Surprise
Layer your bulbs for a continuous display of colour from late winter to late spring.
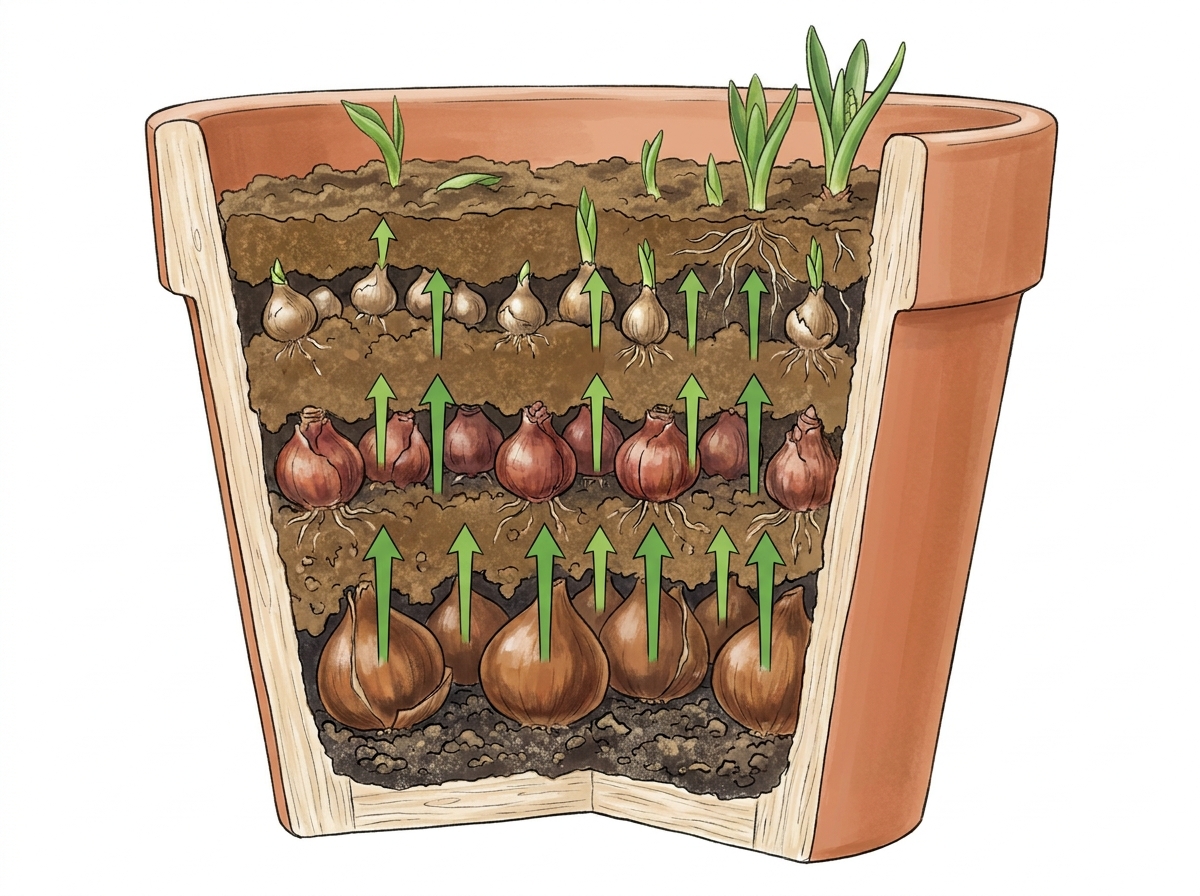
Want a pot that keeps on giving? The lasagne pot method involves planting bulbs in distinct layers, each with a different flowering time. This creates a stunning, sequential display of colour, maximising your container gardening potential. It's a fantastic way to enjoy a long-lasting floral show from a single pot.
Choosing Your Bulbs
The key to a successful lasagne pot is selecting bulbs that bloom at different times. Think about a sequence: early spring, mid-spring, and late spring bloomers. Taller bulbs go at the bottom, with progressively shorter ones planted above.
- Early Spring Bloomers (Bottom Layer): Snowdrops (Galanthus), Winter Aconites (Eranthis), early Dwarf Narcissus.
- Mid-Spring Bloomers (Middle Layer): Tulips (medium height varieties), Hyacinths, Muscari (Grape Hyacinths).
- Late Spring Bloomers (Top Layer): Late-flowering Tulips, Alliums, late Narcissus.
Container and Compost Prep
Choose a deep container, at least 30-40 cm (12-16 inches) deep, with adequate drainage holes. Good drainage is crucial for bulb health. Use a good quality, free-draining compost. A mix of multi-purpose compost with added grit or perlite works well. Avoid heavy garden soil, which can become waterlogged.
- Ensure your pot has drainage holes.
- Add a layer of grit or broken crocks at the bottom for enhanced drainage (optional but recommended).
- Fill the pot with your free-draining compost mix, leaving enough space for the first layer of bulbs.
Planting Your Layers
Planting depth and spacing are vital. Generally, bulbs should be planted at a depth roughly twice their height, and spaced about one bulb width apart. Remember, the largest, earliest flowering bulbs go at the bottom.
- Layer 1 (Bottom): Plant your earliest, largest bulbs (e.g., large tulips, daffodils). Ensure they have space to grow without touching.
- Add a layer of compost (about 8-10 cm or 3-4 inches) over the first layer.
- Layer 2 (Middle): Plant your mid-season bloomers (e.g., hyacinths, muscari).
- Add another layer of compost (about 6-8 cm or 2-3 inches).
- Layer 3 (Top): Plant your latest flowering bulbs (e.g., late tulips, alliums). Leave enough space between them.
- Top up with compost, leaving about 2-3 cm (1 inch) of space below the rim of the pot for watering.
Aftercare for Success
Once planted, water the pot thoroughly. Place it in a cool, sheltered spot. Protection from harsh winds and extreme temperatures is beneficial. Keep the compost moist but not waterlogged, especially during dry spells in late winter and early spring. Feeding isn't usually necessary in the first year as the bulbs have stored energy.
- Water well after planting.
- Site the pot in a sheltered location, ideally receiving ample sunlight (south-facing in the northern hemisphere, north-facing in the southern).
- Water during dry periods, especially as shoots emerge.
- As flowers fade, deadhead spent blooms but leave the foliage to die back naturally. This allows the bulbs to gather energy for the following year.
Rejuvenating Your Lasagne Pot
After the foliage has completely yellowed and died back in late spring or early summer, you have a couple of options. You can carefully lift and divide the bulbs, replanting them in the garden or in new pots. Alternatively, you can leave them in the pot, but you may need to top-dress with fresh compost and feed them to ensure good flowering the following year. Some bulbs may naturalise and flower well for several years.
For an even longer display, consider adding spring bedding plants like pansies or violas to the very top layer, around the emerging shoots of the latest bulbs.
Some bulbs, such as daffodils, can cause skin irritation. It's advisable to wear gloves when handling them.